Quantcast
Channel: ClassiBase
Viewing all 79 articles
Browse latest View live

Speed and resource comparison WordPress vs. Classibase

$
0
0

How fast is Classiabse compared to other scripts? how much resource will be required for certain amount of ads? What is suggested server configuration? There are most common question asked from our customers. To answer these questions we will compare Classibase with WordPress scripts’ resource and time used to generate a page.

We designed Classibase to use only required resources and not load unused files and classes. Also we cache slow and not vital queries like counting ads for one hour to speed up page generation. WordPress loads almost all files even if it is not going to be used for this particular page. There are some performance plugins like caching in wordpress as well.

Performance comparison table

Classibase – live site with 1000 active ads, 3000 total ads website. Performance data is read from built in debug mode which can be enabled by navigating to “Tools” -> “Maintenance” page under “Debug mode” title there is “Enable debug mode” button. After enabling debug mode you logged in as admin will see queries to database, time for each query, and memory usage information at the bottom of each page.

WordPress – live site clasibase.com with 26 active plugins, 100 posts. Memory and number of query values measured with “P3 – Plugin Performance Profiler” plugin. Most resource consuming plugins: bbPress, Google Analytics For WordPress, Quick Cache, s2Member® Framework, Yet Another Related Posts Plugin.

Simple PHP page – page containing only static HTML content and time/ memory measurement functions. Database connection is not used.

Classibase WordPress Simple PHP page
Avarage page generation time (milliseconds) 494 3.199 150
Number of database queries 15 30 0
Memory used MB 4.75 31.53 0.26


What these numbers mean? This means Classibase 6 times faster than WordPress and uses 6 times less resources. These results and performance achieved because Classibase loads only those files that are used on current page and nothing else. While on WordPress almost all PHP files loaded and uses memory even if not used on current page. So if you use classifieds theme or plugin for wordpress then it will also be slower than any stand alone classifieds script like Classibase. WordPress is designed to answer all possible solutions and made extensible in nature. Stand alone classifieds scripts designed to be only classifieds website and nothing else, which makes them more optimized for performance and less flexible.

Average page generation time is measured using Google webmaster tool. See graphs below.

Speed-and-resource-comparison-Wordpress-vs.-Classibase

How much database space will Classibase use?

We tested Classibase with 100K ads and measured database size on 100 MB. For smaller site with 2K ads database size is 6 MB.

Suggested server configuration for Classibase classifieds script

Number of ads 10.000 100.000
Number of pageviews / month 100.000 1.000.000
Server type Shared Dedicated
CPU - 1.2 GHz atom or greater
RAM - 1 GB
Database space 30MB or greater 150 MB at least.
Storage space for images if each ad has one image 2 GB 20 GB

For shared hosting we recommend using Bluehost, for dedicated we are currently using Kimsufi series from OVH.

Disclosure:  Please note that some of the links on this page are affiliate links, and at no additional cost to you, I will earn a commission if you decide to make a purchase.  Please understand that I have experience with all of these companies, and I recommend them because they are helpful and useful, not because of the small commissions I make if you decide to buy something.  Please do not spend any money on these products unless you feel you need them or that they will help you achieve your goals.

The post Speed and resource comparison WordPress vs. Classibase appeared first on ClassiBase.


How to import Ads from other classifieds website?

$
0
0

If you have old classifieds website and want to move your ads to Classibase powered website then we have feature for importing ads using XML file format. Ad importing with XML will import ads and create all necessary categories, locations, custom fields if they are not already created. Before importing ads try it on test server first and check if any custom fields, categories, locations messed up. If everything worked as you expected then repeat process on live site.

Before starting to import ads:

  • Please try importing ads on test site. If everything goes ok then repeat process on live site.
  • Backup your sites images located in /user-content/uploads/adpics/
  • Backup your database using tools provided by your hosting server
  • Make sure that you have access to source server’s database
  • Ad importing will import all ads read from XML, if you want to load only some categories then code your XML generation files accordingly.

To start importing follow these steps:

  1. Navigate to “Tools”->”Import data” on admin panel
  2. At the bottom in “Import ads” area put URL for xml file. XML file should be formatted like displayed in example above URL field. XML generation explained below.
  3. Click “Import” button. After import starts log consisting of actions performed will be displayed below button.

How-to-import-Ads-from-other-classifieds-script

There are cases when ad will not be imported:

  • If user email is not valid ad will not be imported
  • If ad description already exists in classibase database then ad will not be imported

How to generate XML file for old classifieds website ads?

Xml file should be formatted like displayed on “Tools”->”Import data” page. We wrote example PHP file that generates import XML file for zxero classifieds script.

Here are instructions how to use export XML file (source server: server from which you want to copy ads; destination server: server where you want to copy ads, it is where classibase script runs.):

  1. Download PHP files for generating XML. These files will work only with xzero classifieds script. To make it work with other classifieds script you have to completely change export_xml_xzero.php file to fit your source database structure.
  2. Extract files to your computer.
  3. Edit export_xml_xzero.php file. Define following variables with your source server values: DB_NAME, DB_HOST, DB_USERNAME, DB_PASSWORD, IMAGE_URL_PREFIX for your old site.
  4. Upload extracted files to your source server.
  5. Test xml file by navigating http://yoursite.com/export_xml_xzero.php address from your browser.
  6. Then navigate to http://yoursite.com/export_xml_xzero.php?page=2 address from your browser. This is second page with next 10 ads. Classibase will import ads by 10 until all ads imported. This is done to prevent server overloads.
  7. If xml renders correctly then you are ready to import ads from source server.

XML file format

<?xml version="1.0" encoding="UTF-8" ?>
<rss version="2.0">
	<channel>
	<title>SCRIPT_NAME export</title>
	<description>export of existing system data</description>
	<item>
		<title>Ad title here</title>
		<link/>
		<description>Ad description here</description>
		<pubDate>Sat, 11 Aug 2012 16:50:31 +0000</pubDate>
		<verified>1</verified>
		<enabled>1</enabled>
		<email>ad_author_email@test.com</email>
		<showemail>show</showemail>
		<ip>127.0.0.1</ip>
		<location>
			<val>Russia</val>
			<val>Moscow</val>
		</location>
		<category>
			<val>Stuff for Sale</val>
			<val>Household, furniture</val>
		</category>
		<image>http://test.com/adpics/5026713813f6ba03b46a1a9c1.jpg</image>
		<image>http://test.com/adpics/50267137e8b39181a2a9f1601.jpg</image>
		<image>http://test.com/adpics/502671380c92e7d9e98b2f1d7.jpg</image>
	</item>
	... other items below. keep it at most 10 records. per page. paginate adding ?page=2 after url
	</channel>
</rss>

Additional example xml files for importing:


Update 28.03.2014: URL structure and permalinks will not be transferred when you import ads from your old website. All traffic that will come using old URLs will be redirected to home page. Following image of website visitor statistics show that traffic recovered in 5 month and tripled after a year when classifieds website switched from other old script to ClassiBase.

Classifieds website traffic  after switching to ClassiBase increased 3 fold in a year

Classifieds website traffic after switching to ClassiBase increased 3 fold in a year

Related terms: classified Ad import php, how to import ads from other classifieds website, xml classified ads

The post How to import Ads from other classifieds website? appeared first on ClassiBase.

Classibase version 1.4.4 released

$
0
0

We keep improving our classifieds script and constantly add new features to stay up to date with current classifieds website trends. In Classibase version 1.4.4 we added new classifieds website features and widgets. Main focus in this release is to improve classifieds website visually with gallery and carousel widgets. They also will help to promote featured ads and increase your income.

Here are list of important new features added to Classibase in version 1.4.4

Dealer logo and info on ad page

classibase-dealer-logo

Added options to display dealer info on ad page and on listing pages if there is no ad image. If your site has dealer account enabled then it is better to promote dealers on their ad pages. Now you can display dealer short info, website link and logo directly on ad item page. Thus dealers with more ads will be more visible. Which will encourage dealers to add as many ads as they can. In return this will increase ads on your classifieds website and your visibility on search engines. Increasing content on your website is main factor to increase traffic to your website. After becoming popular classifieds website in your niche you can charge for featured ads and increase price as your traffic increases.

Same with displaying dealer logo if there is no ad picture. Your site will look more complete and elegant to your visitors.

Added option to disable ad count

Added option to disable ad count is performance feature. We noticed that if you have more than 500,000 categories (500) x locations (1000) pair on your classifieds website it will slow down and will use lots of system memory on your server. We measured that script with that many locations and categories will use 42 MB system memory on each page and will take 5.3 seconds more time. When for the rest of script it uses 8MB system memory. This is not acceptable resource usage for ad counting. So we made this feature to detect if (number of location) x (number of categories) > 50K and disable ad count for your website automatically.

Notification for actions pending approval

Added notification for admin if there are pending approval ads or pending approval users and dealers. If you installed Classibase classifieds script on many websites and enabled ad moderation then you probably check each of them periodically to know if there are any ads waiting to be moderated. It takes your time to check 3-5 websites daily. So we added this new notification feature which will send email notification to website admins if there are any ads, users, dealers pending approval by admin. It is useful if you have small website with less than 1000 ads. If you have bigger site and these notifications annoy you then you can switch them off from “Settings” -> “Account” page on admin panel, uncheck option “Notify admin about actions pending approval”.

All locations and categories pages

If your classifieds website has many locations and categories you can display them in separate page. For it we added custom variables to page editing. You can use it same way as adding contact form to pages.

Gallery and carousel widgets

This is most wanted feature by our customers. It is a way to promote featured ads and add some animation to classifieds website for grabbing visitor attention.  If you visit popular classifieds websites you will notice carousel widget with 10-20 ads rotation at the top.

classibase-carousel-gallery-widgets

To add such carousel to your classifieds site use “Ads” widget in “Inner top” or “Content top” widget area. Select “List style” as “Carousel” and define thumbnail image width and height to fit your needs. Generally width 120 and height 90 will be size for carousel images. You can use bigger values to make images bigger. Then select “Display single row boxes” option in order to fit carousel images to one line. For number of ads select value between 10 and 20. “List mode” select “Featured”. Also hide widget on “Ad page” and “Ad posting page” in order to not destruct site visitors .

Carousel widget will resize automatically if you view website from mobile device. In same way you can use “Gallery” option from “List style”. It will display all thumbnails and not animate them. It is good to use on sidebar with full width images. To make them fit full width of sidebar set image width to 300 and height 150, it will give premium feel to your website. Also limit gallery ads to display 3-5 ads not more, as you do not want to clutter sidebar with lots of ads.

Both Gallery and Carousel widgets look similar and displays ad title with and price. Your website users will like these 2 widgets and would want to publish their ads and make featured.

Favicon, iphone and andriod icons

Other cool feature is upload favicon for your classifieds website. Previously you had to upload your favicon manually and it would be replaced on script update. Now you can upload favicon from admin panel “Settings” -> “General” page. Favocn should be 144×144 pixel image preferable smaller than 5 Kb file size. Classibase will resize it to required sizes and use it as favicon visible on Google Chrome, Firefox, IE, app icon on iphone, ipad and android devices. If user ads your website to home page on mobile phone this icon will be used as application icon and link to your website. So you can stand out from the crowd by providing unique icon related to your website visible and recognizable in small sizes.

classibase-favicon

There are other minor updates that can be viewed on change log.

I want to thank our customers and supporters for their ideas and suggestions, thank you.

The post Classibase version 1.4.4 released appeared first on ClassiBase.

Olxer Responsive Classifieds Theme

$
0
0

olxer-intro

Demo Download

Olxer  is a clean and responsive classifieds theme for ClassiBase, perfect for your website. The theme has seemingly tons of options thanks to the beautiful design, clean code that has been SEO optimized, support for breadcrumbs, some great custom widgets and much more.

Design is kept simple and made similar to popular classifieds website Olx.

Lots of Great Features

We’ve added tons of great features and options to the Olxer responsive theme. Have a look at the list of features below and you will see why you’ll have to use this theme today.

Responsive: Olxer is fully responsive! Your classifieds website will look great on any device desktop, tabled and mobile phone. With growing usage of mobile devices your website will fit perfectly to latest popular mobile devices including iphone 5 and galaxy S4.

Unlimited Custom Colors: Theme has built in color customization with preset color schemes. You can make your classifieds website look unique with unlimited colors, background image and font combination.  Colors are selected with color picker and theme preview is generated automatically while you designing your classifieds theme.

olxer-colors

Clean design: We kept design simple and clean so that your visitors will not be destructed and focus on content. Content and widgets are clearly separated with slim gray border keeping your site clean.

Powerful Theme Options: You can upload your own logo, decide if you want to display general search on top and sidebars on ad item page.

And More!: We plan to provide regular updates and new features as we see fit. Thank you for any suggestions and of course your purchase!

Olxer Responsive ClassiBase Theme Features

  • Compatible with ClassiBase 1.4.4
  • Responsive layout
  • Custom logo option
  • Unlimited colors
  • Lightbox for ad images
  • Left Sidebar Page Template
  • Right Sidebar Page Template
  • 6 Widget Locations
  • HTML5 + CSS3
  • Supported widgets include Google maps, featured ads carousel, ads thumbnail gallery, related ads, locations, categories, custom search form and other standard widgets.

Olxer Classifieds Theme Updates

Version: 1.7.6 (2014.09.11)

  • Added support for script version 1.7.6

Version: 1.6 (2014.04.19)

  • Added support for script version 1.6

Version: 1.5.1 (2014.03.07)

  • Fixed chain menu focus bug

Version: 1.5 (2014.03.02)

  • Added support for script version 1.5

Version: 1.4.7 (2014.01.27)

  • Added support for script version 1.4.7

Version: 1.3 (2014.01.20)

  • Added support for script version 1.4.6

Version: 1.2 (2013.10.05)

  • Added default colors as color scheme

Version: 1.1 (2013.10.04)

  • Added color, font and background image customization. Also has preset color schemes.

Version: 1.0 (2013.09.27)

  • Initial release

Related terms: osclass free templates, Olxs themes com, osclass free theme, osclass responsive theme free, osclass themes premium

The post Olxer Responsive Classifieds Theme appeared first on ClassiBase.
Classibase version 1.4.5 released – Other Currencies

$
0
0

We keep improving our classifieds script and constantly add new features to stay up to date with current classifieds website trends. In Classibase version 1.4.5 we added new classifieds website features and widgets.

Here are list of important new features added to Classibase in version 1.4.5

Currency setting for PayPal payments (EUR, GBP etc.)

We added currency setting for PayPal payments. If you create classifieds website for countries with currency other than US dollar then this is must have feature for your classifieds website. You can choose from 24 different currencies supported by PayPal. This is useful if your website is in Europe where people use euro for all their payments, they will feel more comfortable making payments on your website. Because converting from euro to dollar in their mind before making payment may dramatically reduce number of paid users. Where if payments are done in euro they will make decision much quicker and will be more likely to purchase your service.

There are some restrictions for some currencies. View currency terms from PayPal developer website.

Here is list of currently supported currencies by PayPal integrated to Classibase classifieds script:

  • Australian Dollar AUD
  • Brazilian Real BRL
  • Canadian Dollar CAD
  • Czech Koruna CZK
  • Danish Krone DKK
  • Euro EUR
  • Hong Kong Dollar HKD
  • Hungarian Forint HUF
  • Israeli New Sheqel ILS
  • Japanese Yen JPY
  • Malaysian Ringgit MYR
  • Mexican Peso MXN
  • Norwegian Krone NOK
  • New Zealand Dollar NZD
  • Philippine Peso                PHP
  • Polish Zloty PLN
  • Pound Sterling GBP
  • Singapore Dollar SGD
  • Swedish Krona SEK
  • Swiss Franc CHF
  • Taiwan New Dollar TWD
  • Thai Baht THB
  • Turkish Lira TRY
  • U.S. Dollar USD

To set paypal currency go to “Settings” -> “Payment” page from admin panel and set “Paypal currency” value.

paypal-currency-change

Currency formatting settings $500, 500$

Previously you were able to define currency for price custom field, now we added option to format currency according to your sites geographic target. You can define currency position before or after amount, define decimal separator and thousand separated per locale defined on your website. To view available options visit “Settings” -> ”Currency” page from admin panel.

currency-formatting

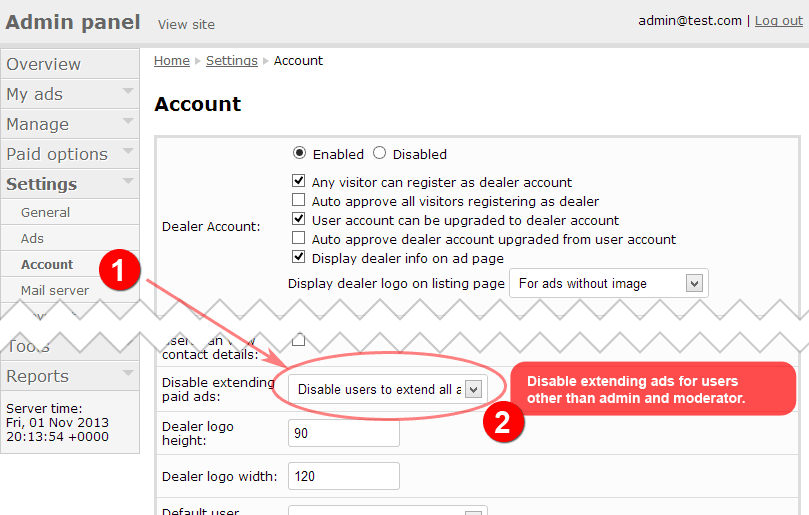
Disable extending ads by users.

Available options are: enable extending all ads, disable extending paid ads, and disable extending all ads. It is useful if you do not want allow users to extend their ads or paid ads. For example for job website it is paid listing per 30 days. You should not allow extending those ads in order to keep sites revenue stable and continuous. To disable ad extending for users go to “Settings”->”Account” page from admin panel and select appropriate option for “Disable extending paid ads” field.

disable-extending-ads

Auto delete expired ads

Over your classifieds may get clutter with expired ads dating 2-3 year old back. You can automatically delete them with this new feature. Specify number of days you want expired ads be deleted after and forget about it. This will keep your database slim and fast as always. If you want to keep all ads even after expiring and never want to delete them then you set this value to -1. Default option is -1 so you do not to make any changes here if you do not want expired ads to be deleted. To set this setting go to “Settings” -> “Ads” page from admin panel and set “Delete ad after days” field value.

delete-ads-after-expiring

Ads widget display only ads with image

On our previous update we added options to display ads widget as gallery and carousel view. Both those view rely on ad image. To make most out of those views we added option to choose and display ads with images only. So you can display latest, related or featured ads with images only on ads widget. To set this setting open related ads widget and select “Display ads with image” checkbox.

display-only-ads-with-image

There are other minor updates that can be viewed on change log.

I want to thank our customers and supporters for their ideas and suggestions, thank you for your support.

The post Classibase version 1.4.5 released – Other Currencies appeared first on ClassiBase.

How to add YouTube Video custom field to Classibase?

$
0
0

Video support was added to class base in version 1.4.6.  Now you can define as many video custom fields as you like to your classifieds website. This tutorial will explain how to add YouTube video custom field to Classibase from scratch. You may need to skip some fields if they are already predefined in your copy of the script.

video-custom-field-demo

Check if video custom field defined

define-video-custom-field

Before assigning and video custom field make sure that it is defined. If video custom field is not defined then define it.

  1. Navigate to “Manage” -> “Custom fields” on admin panel.
  2. Check type column if you have video_url field defined. If yes then skip to adding custom field to category.
  3. In case video_url custom field is not defined then click on “Add new” button at the top.
  4. Select type Video from drop down list.
  5. Enter name for Custom field for example “Video”. This will be displayed before video url custom field on ad page and as field name when posting an ad.
  6. Click “Submit” button and save new custom field.

Add video custom field to category

Add-video-custom-field-to-category

  1. Navigate to “Manage” -> “Category custom fields” page on admin.
  2. Click “Add new” button at the top.
  3. Select location if you want to make this custom field to appear only for certain location. Generally “All locations” option used because we want to display video for cars in all locations.
  4. Select category from drop down list. In our case we select “Cars”.
  5. Click “Submit” button. New page will load all available custom fields and previously defined custom fields for selected category and location combination.
  6. Drag “Video” custom field from “Available fields” area to “Submit Form” area in order that you want it to appear.
  7. Click “Save” button.

After adding Video custom field it will be displayed when submitting new ad.

You can also add more than one video field by defining and adding to category new video field as explained above.

Related terms: нщгегиу мшвущ ашудв

The post How to add YouTube Video custom field to Classibase? appeared first on ClassiBase.

Classibase version 1.4.6 released – Youtube video custom field

$
0
0

This release contains some important bug fixes and some cool new features like YouTube video integration.

Here are list of important new features added to Classibase in version 1.4.6

YouTube video custom field

Video is great way to display your item in detail. It will give confidence to buyer especially if you are selling big items like properties, cars, yachts etc. We added video custom field to Classibase so that you can allow adding videos for your site users. Video custom field works similar to other custom fields in Classibase. You can add video to certain categories, for example to cars and properties category. This way it will not be shown on irrelevant category like job listing for example.

To view detailed tutorial about adding video to your classifieds website read here.

video-custom-field-demo

Display popular users to encourage ad posting

We added “Users” widget to display latest or popular users. It is regular widget similar to existing “Ads” widget with simple, gallery and carousel views. Users are selected related to active location in order to display related users.

Updated Price custom field storage type

Before it was storing price field as integer which was insufficient for some users who want to list items with smaller price. That is why we changed price custom field to store float number in order to be enable to display price with decimal places like 3.20$ or 10.99$.

There are also minor changes and bug fixes in version 1.4.7 and 1.4.8.  You can view change log here.

The post Classibase version 1.4.6 released – Youtube video custom field appeared first on ClassiBase.

How to display total number of ads in Classifieds website?

$
0
0

Displaying total number of ads will encourage site visitors to post their ads and will give some credibility to your classifieds website. Also this will work positive if you have more than 100 ads, other vise your site may give impression of dead website to new visitor.

In Classibase we have very flexible “Text” widget which can be regular text, JavaScript or PHP. For displaying total number of ads, ads posted last month and last day we will use PHP. Getting total number of ads in Classibase may be tricky for some users that is why we created this tutorial to give exact PHP code that you can use for your website.

Here is PHP code that will get number of ads total, last month and last day:

Total ads <b><?php echo Ad::countByClass('Ad', 'listed=?', array(1));?></b>, last month <b><?php echo Ad::countByClass('Ad', 'listed=? AND added_at>?', array(1,floor(REQUEST_TIME/3600)*3600-3600*24*30));?></b>, last day <b><?php echo Ad::countByClass('Ad', 'listed=? AND added_at>?', array(1,floor(REQUEST_TIME/3600)*3600-3600*24));?></b>

Paste it to your text widget and select text format as PHP as shown in image. To read more about how to place text widget read this tutorial.

This code will display result like displayed below:

Total ads 3439, last month 865, last day 28

total-ads-widget

If you have multilingual classifieds website then remember pasting given text for all languages, otherwise it will not show for other languages.

We used Ad::countByClass(‘Ad’, ‘listed=?’, array(1)); method to get total number of live ads.

For day and month totals we used floor(REQUEST_TIME/3600)*3600 to round time because Ad::countByClass method have built in caching feature which will use every parameter as cache key. So this will keep database queries to your server at minimum level by caching results.

Also you can style your code using HTML and CSS if you want total number of ads to catch attention of your visitors.

The post How to display total number of ads in Classifieds website? appeared first on ClassiBase.


Classibase version 1.5 – Chain Select

$
0
0

This is quick release for adding most requested feature chained select for locations and categories when posting new ad. It is useful if you have more than 100 locations with multilevel depth. Chain select will allow you to select main location, then sub locations will be visible to select further. This way it is simpler for your site visitors to post ads.

Important: Remember to update your theme to version 1.5 for chain select to work.

chain-select

View full change log.

The post Classibase version 1.5 – Chain Select appeared first on ClassiBase.

Add placeholder to text inputs

$
0
0

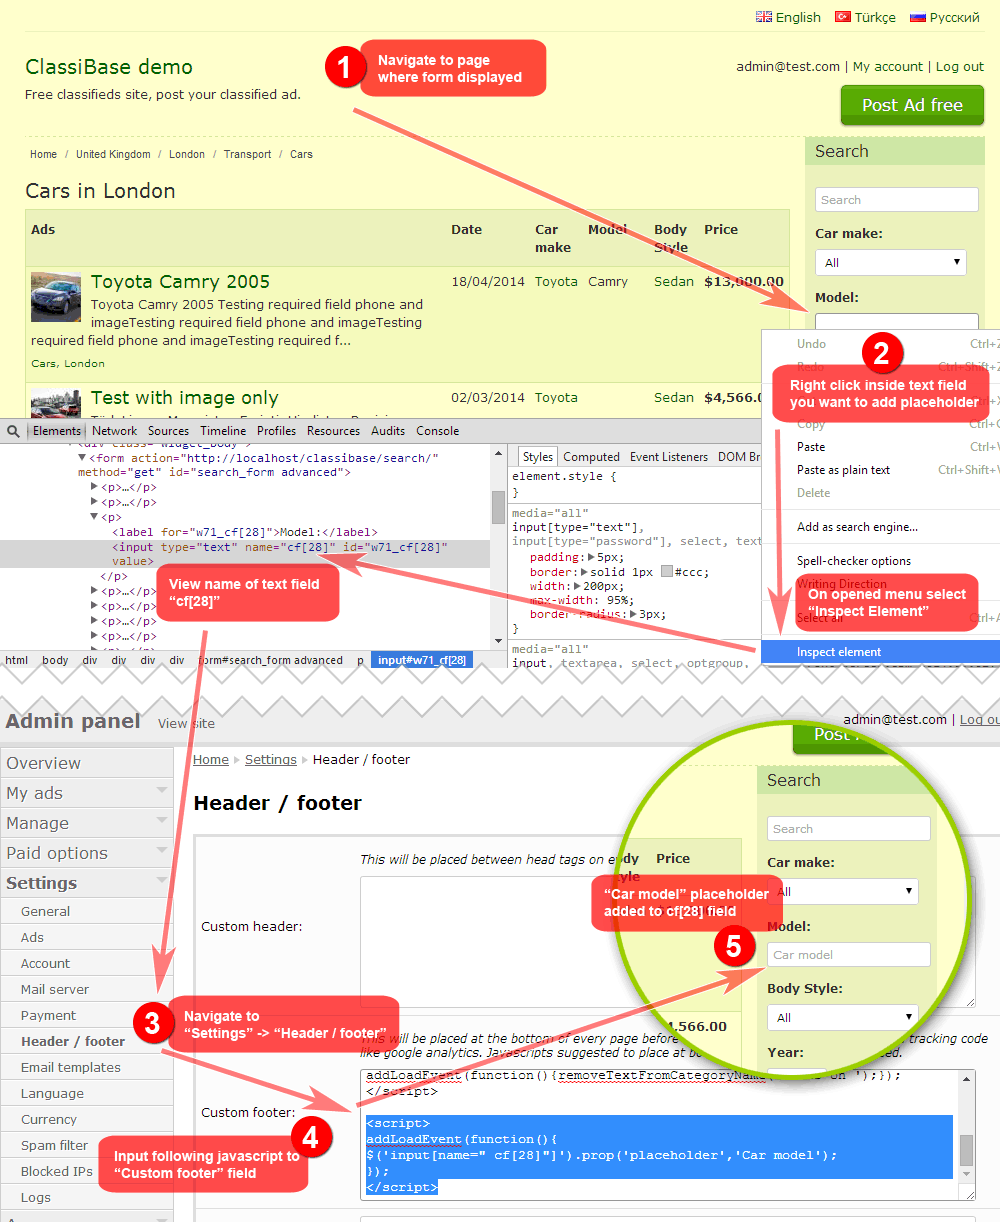
For some text search fields or inputs you may want to add default text as placeholder to explain what to enter there. You can accomplish it using javascript in Classibase. Here are steps to add placeholder to custom text fields.

placeholder

  1. Using Google Chrome web browser, navigate to page where form displayed. For example we want to add placeholder text to car model text field in search form.
  2. Right click inside text field you want to add placeholder. On opened menu select “Inspect Element” and view name of that text field. In our example it is “cf[28]”
  3. Now login to admin panel. Navigate to “Settings” -> “Header / footer” page.
  4. Input following javascript to “Custom footer” field.
    <script>
    addLoadEvent(function(){
    $('input[name="cf[28]"]').prop('placeholder','Car model');
    });
    </script>
  5. This snipped adds “Car model” text as placeholder to cf[28] field which is model custom field.

You can view these steps in this image tutorial. This tutorial was created to guide site owners using our  classifieds script ClassiBase. View related forum topic.

The post Add placeholder to text inputs appeared first on ClassiBase.

Main categories with icons like on Quikr website

$
0
0

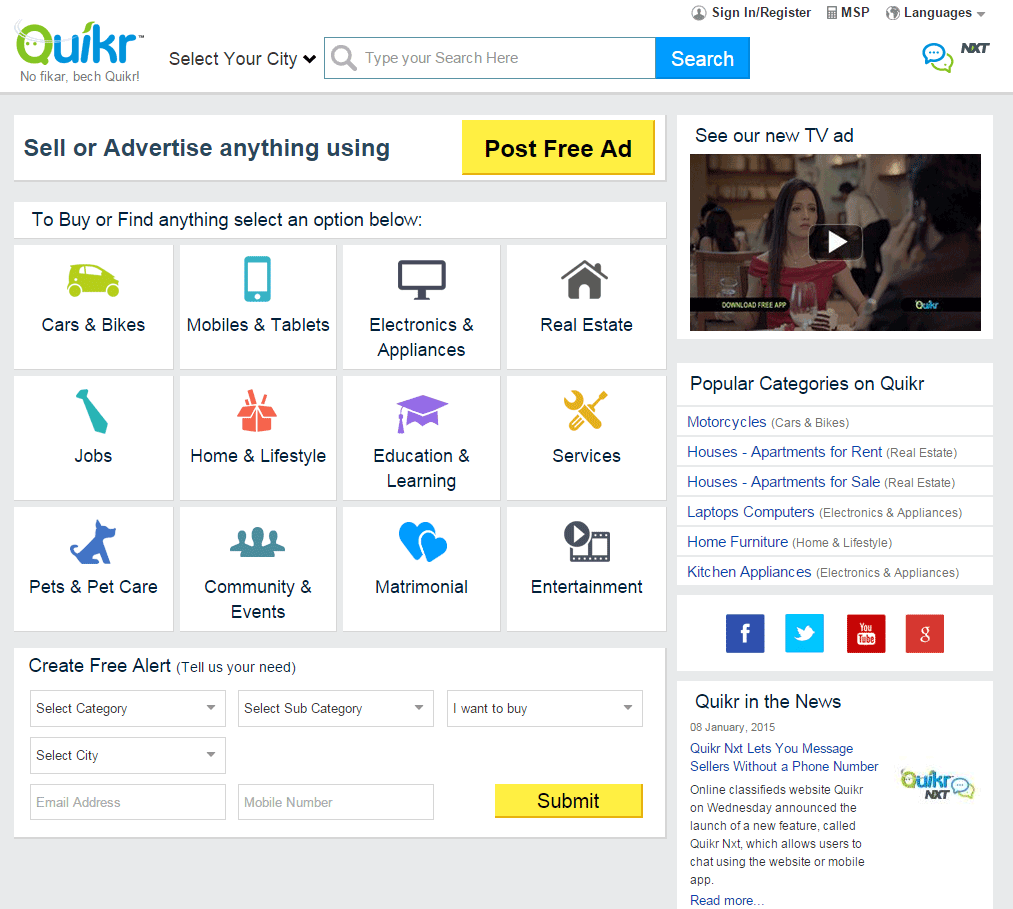
Many of our customers asked for adding icons to main categories for making more appealing for site visitors. As an example you can see home page of quikr.com, India’s most popular classifieds website. They have main categories with icons on home page.

quikr.com-homepage

As many of you know there is no built in way adding icons to categories.  But we can use custom PHP code in “Text” widget to list main categories and display image for each category. Here we will explain how to do it. It is a bit complicated solution so be prepared.

Prepare your icons for each main category. In our example we will use icons similar to quikr.com website for following categories: Transport, Property, Jobs, Services and Stuff for sale. They are also main categories on our demo site. Each image should have same size. Name them similar to your category names so you do not get confused later.

our-icons

After creating your images upload them with FTP to /public/images/cat-icons/ folder. You can use any location in /public/images/ folder, we used “cat-icons” in our example.

Then open web browser and go to your website and login as administrator.

Learn id for each main category. Follow this steps to learn category ids.

main-cat-icon

  1. Navigate to “Manage” -> “Categories” page on admin panel.
  2. Move mouse over category name link and note id which is last number in displayed url. In our example displayed url is http://localhost/classibase/admin/categories/1/ and id is “1”. Note this on paper and learn ids for all main categories. In our example they are:
    • 1: Transport
    • 2: Property
    • 4: Jobs
    • 50: services
    • 55: Stuff for sale

Write PHP code to associate category ids with category icons that we created earlier. Then get main categories and display them, also add some CSS styling. Here is code that we created for our tutorial.

<?php 
// create category id and icon name map. This may be different for your website because you will have different categories, ids and images.
$cat_icon_map = array(
 '1' => 'car.png',
 '2' => 'prop.png',
 '4' => 'job.png',
 '50' => 'service.png',
 '55' => 'goods.png',
 );
 
// get current active location
$selected_location = self::$_vars['selected_location'];
 
// get all categories
$categories = Category::getAllCategoryNamesTree(Category::STATUS_ENABLED);
$return = '';
foreach($categories[0] as $cat)
{
 $img = '<img src="'.URL_ASSETS.'images/cat-icons/'.$cat_icon_map[$cat->id].'" />';
 $return .= '<a href="'.Location::url($selected_location, $cat).'">'.$img.'<span>'.View::escape(Category::getName($cat)).'</span></a>';
}

echo '<div class="cat-icons">'.$return.'</div>';
?>
<style>
.cat-icons{text-align:center;}
.cat-icons a{display:inline-block;width:150px; height:70px; text-align:center; background:#fff;text-decoration:none; padding:10px 0; margin:1px;min-width:19%;}
.cat-icons a:hover{text-decoration:underline;}
.cat-icons a img{}
.cat-icons a span{display:block; font-size:130%;}
</style>


Paste it to your text widget and select text format as PHP as shown in image. To read more about how to place text widget read this tutorial. Remember placing widget to “Pages” – “Home Page” not to “Sidebar”. Switch from sidebar to pages is located on right top position in “Appearance” -> “Widgets” page.

main-cat-icon-result

You can download tutorial files with php code here.

PS: We have 5 main categories that's why we set min-width:19%; in our css. If you want 4 items per line like on quikr then set it to 24%. 1% is reserved for margins.

Update: If you want multilevel navigation like in olx.in, then you have to edit theme files. Detailed instructions are explained in our forum post here.

Related terms: Quikr the main page

The post Main categories with icons like on Quikr website appeared first on ClassiBase.

Apply custom CSS to Classibase Themes

$
0
0

Classibase themes are flexible and theme appearance can be changed using Admin Panel. You can change site logo, title, description, apply color presets if your theme has built in presets. If those are not enough to you and you want apply custom CSS code to your theme then we have built in feature to do it for all our themes.

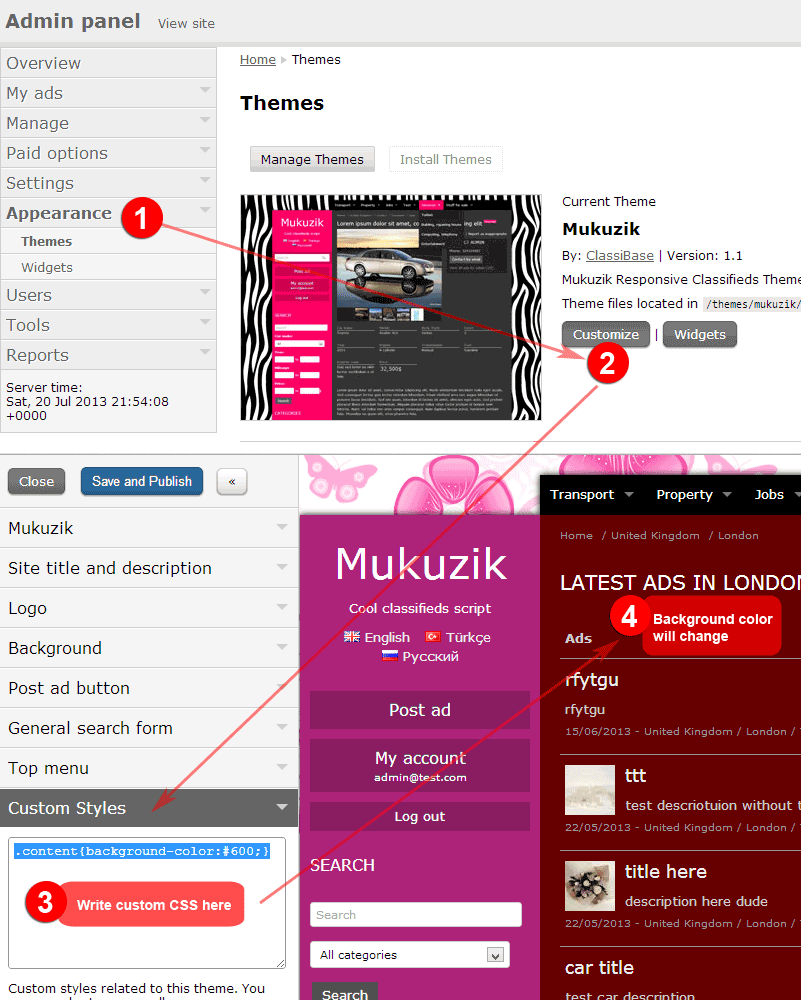
How to apply custom CSS to your theme

custom-css-theme

  1. Go to Appearance -> Themes in admin panel.
  2. Click “Customize” button for theme you want to edit.
  3. On opened page go to “Custom styles” tab on left panel and write custom CSS code in opened text field. Write CSS code without <style> wrappers as shown in picture.
  4. When you click outside text field preview of theme on right will update and you will see changes.

This is useful to make small customization to your theme. Instead of editing your theme files you apply custom CSS directly from admin panel.

Advantage of using Custom Styles instead of directly editing your theme is that your changes will be applied when you update your current theme. So you do not have to manually edit your files every time when you update your theme.

Custom styles are valid for current theme only. Every theme has its own custom styles.

The post Apply custom CSS to Classibase Themes appeared first on ClassiBase.
How to Install Classibase script on iPage hosting

$
0
0

We assume that you have purchased hosting and domain from iPage web hosting. This tutorial will guide you through steps for installing Classibase classifieds script on iPage.

  1. Download classibase script from your user area on classibase.com. Extract files to some folder on your computer.
  2. Log in to your account on ipage. If you are installing for main domain then you can move to step 5.
  3. If you have multiple domains on same hosting then each domain should point to separate directory. Click on “Domain Central” to define directory for your secondary domain.
  4. Click on domain name that you want to install script. Click on “Points to” button to change domain from “Home directory” to “Subdirectory” and type name same as our domain name for knowing when you see directory name.
  5. Open FTP client ( we use WinSCP, you can use any FTP client ) and log in to your server. Log in details can be found in your ipage control panel.
  6. Navigate to Subdirectory that you created in step 4 and upload Classibase files that you extracted on step 1.
  7. In iPage control panel from top navigation navigate to “Website” -> “Mysql database” to view database details. Create separate database if it is not created already. In our case it was already created with same name as domain name. Get MySql server name, database name, username and password from this page.
  8. Navigate to domain with your web browser. You will see Classibase installation screen. Enter database details that you get on step 7. Also enter admin email and password. Then click submit.


If everything is correct, you will be prompted with successful installation. You can check if ads with image works correctly by adding some test listings.

install-classifieds-on-ipage

After installation you can manage your classifieds website. Edit and add locations, categories, custom fields, locales, change theme if necessary, update site name and description details. After all these done you can add couple ads ­­­from local newspaper or other website to each category to start process for organic posting. Advertise your new website in related sites, forums, blogs.

The post How to Install Classibase script on iPage hosting appeared first on ClassiBase.
Classibase version 1.4.4 released

$
0
0

We keep improving our classifieds script and constantly add new features to stay up to date with current classifieds website trends. In Classibase version 1.4.4 we added new classifieds website features and widgets. Main focus in this release is to improve classifieds website visually with gallery and carousel widgets. They also will help to promote featured ads and increase your income.

Here are list of important new features added to Classibase in version 1.4.4

Dealer logo and info on ad page

classibase-dealer-logo

Added options to display dealer info on ad page and on listing pages if there is no ad image. If your site has dealer account enabled then it is better to promote dealers on their ad pages. Now you can display dealer short info, website link and logo directly on ad item page. Thus dealers with more ads will be more visible. Which will encourage dealers to add as many ads as they can. In return this will increase ads on your classifieds website and your visibility on search engines. Increasing content on your website is main factor to increase traffic to your website. After becoming popular classifieds website in your niche you can charge for featured ads and increase price as your traffic increases.

Same with displaying dealer logo if there is no ad picture. Your site will look more complete and elegant to your visitors.

Added option to disable ad count

Added option to disable ad count is performance feature. We noticed that if you have more than 500,000 categories (500) x locations (1000) pair on your classifieds website it will slow down and will use lots of system memory on your server. We measured that script with that many locations and categories will use 42 MB system memory on each page and will take 5.3 seconds more time. When for the rest of script it uses 8MB system memory. This is not acceptable resource usage for ad counting. So we made this feature to detect if (number of location) x (number of categories) > 50K and disable ad count for your website automatically.

Notification for actions pending approval

Added notification for admin if there are pending approval ads or pending approval users and dealers. If you installed Classibase classifieds script on many websites and enabled ad moderation then you probably check each of them periodically to know if there are any ads waiting to be moderated. It takes your time to check 3-5 websites daily. So we added this new notification feature which will send email notification to website admins if there are any ads, users, dealers pending approval by admin. It is useful if you have small website with less than 1000 ads. If you have bigger site and these notifications annoy you then you can switch them off from “Settings” -> “Account” page on admin panel, uncheck option “Notify admin about actions pending approval”.

All locations and categories pages

If your classifieds website has many locations and categories you can display them in separate page. For it we added custom variables to page editing. You can use it same way as adding contact form to pages.

Gallery and carousel widgets

This is most wanted feature by our customers. It is a way to promote featured ads and add some animation to classifieds website for grabbing visitor attention.  If you visit popular classifieds websites you will notice carousel widget with 10-20 ads rotation at the top.

classibase-carousel-gallery-widgets

To add such carousel to your classifieds site use “Ads” widget in “Inner top” or “Content top” widget area. Select “List style” as “Carousel” and define thumbnail image width and height to fit your needs. Generally width 120 and height 90 will be size for carousel images. You can use bigger values to make images bigger. Then select “Display single row boxes” option in order to fit carousel images to one line. For number of ads select value between 10 and 20. “List mode” select “Featured”. Also hide widget on “Ad page” and “Ad posting page” in order to not destruct site visitors .

Carousel widget will resize automatically if you view website from mobile device. In same way you can use “Gallery” option from “List style”. It will display all thumbnails and not animate them. It is good to use on sidebar with full width images. To make them fit full width of sidebar set image width to 300 and height 150, it will give premium feel to your website. Also limit gallery ads to display 3-5 ads not more, as you do not want to clutter sidebar with lots of ads.

Both Gallery and Carousel widgets look similar and displays ad title with and price. Your website users will like these 2 widgets and would want to publish their ads and make featured.

Favicon, iphone and andriod icons

Other cool feature is upload favicon for your classifieds website. Previously you had to upload your favicon manually and it would be replaced on script update. Now you can upload favicon from admin panel “Settings” -> “General” page. Favocn should be 144x144 pixel image preferable smaller than 5 Kb file size. Classibase will resize it to required sizes and use it as favicon visible on Google Chrome, Firefox, IE, app icon on iphone, ipad and android devices. If user ads your website to home page on mobile phone this icon will be used as application icon and link to your website. So you can stand out from the crowd by providing unique icon related to your website visible and recognizable in small sizes.

classibase-favicon

There are other minor updates that can be viewed on change log.

I want to thank our customers and supporters for their ideas and suggestions, thank you.

How to Install Classibase on iPage hosting

$
0
0

We assume that you have purchased hosting and domain from iPage web hosting. This tutorial will guide you through steps for installing classibase classifieds script on iPage.

  1. Download classibase script from your user area on classibase.com. Extract files to some folder on your computer.
  2. Log in to your account on ipage. If you are installing for main domain then you can move to step 5.
  3. If you have multiple domains on same hosting then each domain should point to separate directory. Click on “Domain Central” to define directory for your secondary domain.
  4. Click on domain name that you want to install script. Click on “Points to” button to change domain from “Home directory” to “Subdirectory” and type name same as our domain name for knowing when you see directory name.
  5. Open FTP client ( we use WinSCP, you can use any FTP client ) and log in to your server. Log in details can be found in your ipage control panel.
  6. Navigate to Subdirectory that you created in step 4 and upload Classibase files that you extracted on step 1.
  7. In iPage control panel from top navigation navigate to “Website” -> “Mysql database” to view database details. Create separate database if it is not created already. In our case it was already created with same name as domain name. Get MySql server name, database name, username and password from this page.
  8. Navigate to domain with your web browser. You will see Classibase installation screen. Enter database details that you get on step 7. Also enter admin email and password. Then click submit.

If everything is correct, you will be prompted with successful installation. You can check if ads with image works correctly by adding some test listings.

After installation you can manage your classifieds website. Edit and add locations, categories, custom fields, locales, change theme if necessary, update site name and description details. After all these done you can add couple ads ­­­from local newspaper or other website to each category to start process for organic posting. Advertise your new website in related sites, forums, blogs.


Reducing spam with captcha on classifieds website

$
0
0

Spam is very annoying on publicly available sites and classifieds website is not an exception. Spammers target classifieds websites to reach real users and offer usually not legit products, posting to several location and categories. As a classifieds website owner you do not want spam messages appear on your site and destruct real users. Sites […]

The post Reducing spam with captcha on classifieds website appeared first on ClassiBase.
How to add custom field to classifieds website?

$
0
0

This tutorial explains how to add custom field to Classifieds website using Classibase script. Classifieds sites can have different custom fields for different categories. For example on “Flats and houses for sale” property you should have property custom fields like number of rooms, floor, area, address, price etc. For “Cars for sale” category you should […]

The post How to add custom field to classifieds website? appeared first on ClassiBase.

Display street address on Google map

$
0
0

This tutorial explains how to display Google map for ads with address custom field on Classibase classifieds script. Map is useful for property, service and job listings. There are several settings to complete in order to display Google maps. These steps are already set by default for fresh Classibase installs using version 1.4 or later. […]

The post Display street address on Google map appeared first on ClassiBase.

How to publish link on classifieds website?

$
0
0

On general classifieds websites it is common to have different custom fields for different categories. Link to a company website is one of many common custom fields as well as price, year etc. Link is usually used for vacancy, job, product, service categories. On Classibase classifieds website building script there are two ways to link […]

The post How to publish link on classifieds website? appeared first on ClassiBase.

Classibase image settings

$
0
0

Product images is essential feature of classifieds website. On Classibase classifieds script you can control number of images uploaded per ad, image size and thumbnail size displayed on item page and on listings. Also you can append watermark with your domain name to images in order to drive traffic from users who found images from […]

The post Classibase image settings appeared first on ClassiBase.

Viewing all 79 articles
Browse latest View live